Saturday, October 6, 2018

New Tools: Bias Tape maker

Sometimes, you just have to try a new tool or technique.  I recently tried out a bias tape maker for the first time.  It's a great tool for a very specific task.  This tool is a staple of the quilter's toolbox, but not so much so for garment and home dec sewers.


 First, why would you want to make bias tape in the first place?  You can buy it already made in a variety of colors.  Simple. Right?  Sometimes, you'd like to have bias tape that matches a fabric.  Bias tape can be used for things like armhole binding, like on an upcoming project.  It can also be used as a decorative element, like on another upcoming project, where I wanted bias tape made of satin, rather than plain cotton fabric.   Quilters use it for binding quilts, where matching the fabric in a quilt adds a lot to the final effect.  So, making your own bias tape gives you options. 

Bias tape makers come in a variety of widths, too, so you aren't just stuck with the standard 1/2" width.

The first step of the process is to make a long strip of fabric cut on the bias, diagonal to the grain of the fabric.  A long strip of bias cut material is sewn together to make a loop. However, the ends of the loop are offset.


  Now the fabric is cut in a helical pattern.  The trick is to make the strip a very uniform width.  It should be 1/2" wider than the bias tape.
Unfortunately, on attempt #1, the width of the fabric strip was to variable and too narrow in spots.  There wasn't enough to fold over in some places.  I actually had go give up on this and buy new fabric!

I discovered that using scissors to cut the strip is a disaster.  It's better to use a ruler and rotary cutter.  Also, the 1/2" bias tape maker will actually accept a 1 1/4" strip.  That leaves a little room for error in the cutting, especially since I cut the strip 1 1/2" wide, then trimmed where necessary.  That was a lot of work, but it did work!

The  final step is to feed the fabric through the tool.  It goes in flat, it comes out folded.  Then you use an iron to crease the material.  You use the loop to pull the bias tape maker along the fabric strip.
I did try making bias tape by folding over the edges of a fabric strip.  Don't do it!  Getting a uniform width, especially if the fabric strip isn't a uniform width is very difficult.

Come back next time for some applications of the bias tape maker.

Saturday, September 29, 2018

Halloween Costume, Part 3

The last piece for the Madeline costume is a short cape with a red ribbon tie. It's worn over the dress to suggest a caped jacket.  Here's the cape and the dress from last week together.
There isn't a pattern for the cape.  I decided to just wing it and make a full circle cape 8" long.  That's ridiculously short for an adult, but should be just about right for an 18 month old.  I used the dress to decide that the center whole should be 4" across.

To cut a circle, it's easiest to use symmetry.  The fabric is folded 4 times, then a quarter circle measured out.
The final piece is a doughnut shape with one cut through it.  This is exactly the shape I used for the Christmas Tree Skirt.
The front slit and outer edge were finished by turning under 1/2" and stitching.  This isn't a good technique for clothing, but it's OK for a costume, particularly since the polyester cotton broadcloth fabric doesn't ravel much.
Turning under the inner edge proved to be impossible, due to the tight curve, so I just used and overcast stitch on it.  The neck edge of the cape will be hidden under the collar anyway.

The final step is to add red ribbon ties.
The costume is finally done.  Here's the whole ensemble together:
Come back next week for a whole new fall project!

Saturday, September 22, 2018

Halloween Costume, Part 2

Last week, I introduced you to the Madeline costume I'm making for an 18 month old and discussed the construction of a hat.  This week, I'm working on the major piece of the costume, a blue dress with a white Peter Pan collar.

I looked for a pattern for such a thing, but it didn't exist.  The best I could do is Butterick 4110, a dress with huge bib collar and at least the right sort of neckline.  I used the collar pattern piece to create a new collar.  The inside curve of the collar is exactly the same as the original collar and the outside is something that I drew that I thought would look about right.  The collar uses a 1/4 seam, unlike the rest of the dress, which is 5/6" seams,  There's no need for excessive bulk from seam allowances inside the collar.
Four pieces of the collar are cut and then sewn together in pairs.  The result is shown here, the front is at the top.
Finally, the collar pieces are attached to the outside of the dress, with the two pieces overlapping at the front so that they just touch at the neck seam.

When the dress is finished, the collar is pressed to the outside.  I got the halves of the collar to just touch -- an important style feature for this type of collar.
The dress has a button closure in the back.  I'm not a big fan of buttons on clothes for people to young to be trusted not to try and swallow them, so I substituted a zipper.  The front and back yokes were finished just by turning under the inside yoke and sewing it down.  This is a lot faster than hand stitching.
The sleeves were finished with just a simple elastic in a casing.
Come back next week and see how I finished off the costume!

Saturday, September 15, 2018

Halloween Costume, Part 1

I was asked to make a Halloween costume for a delightful 18 month old girl.  Her mother came up with the idea of Madeline and the nun as a mother/daughter combination.  If you aren't familiar with Madeline, she's the star of her own beloved series of children's books.
In all of the books, Madeline wears a yellow hat with a black ribbon and a blue outfit with a shoulder cape.  I decided to start with the hat.

The pictures depict a flat-crowned hat.   I looked hard in my pattern collection for something similar, but didn't find anything that worked.  So, I made my own pattern.

It starts with a 7.5" diameter circle.  I drew it in PowerPoint and printed it.  With 1/4" seams, the circumference of the hat crown is 22".
Here, I am cutting the brim pieces.  I measured out 2 1/4" from the circle, and then made a torus (doughnut shape) 2 1/2" wide.  There are two brim pieces, for the top and bottom.  The crown of the hat is just a rectangle 3" x 22 1/2".  Here's all the pieces, two each of the brim, crown, and top.


To make the brim stiff and stick out straight from the hat, I used an iron-on interfacing on BOTH pieces of the brim.  They are then sewn together with a 1/4" seam, inverted, pressed, and top stitched.
The crowns are each sewn together on the short sides, then sewn to the top.  The result is two crown and top assemblies.  One of these will be the outside, the other the lining.
I wasn't completely sure of the right head measurement, and it will even change in the next couple of months.  I added some elastic to the inside, sewing it to the seam allowance.  This will let the hat fit a range of head sizes.  The elastic is at the back of the hat.
Now the lining is hand sewn to the crown/brim seam allowance, completely hiding the elastic.
The finishing touch is the black ribbon, also hand stitched to the hat to keep it in place.  There's long tails that can be tied in a bow.
Come back next week for another piece of this fun costume!


Saturday, September 8, 2018

Jacket, Part 2

Last week, I talked about the first work on a new jacket.  This week, I'll show you how it turned out.

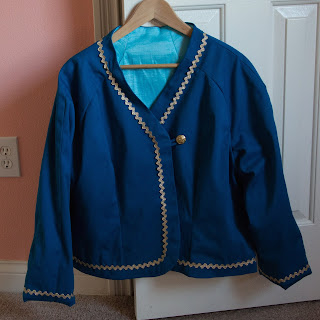
 At the end of last week's post, I had basted together the shell of the jacket and found that it fit.  I also decided that it was too plain, so I'd planned to add metallic rick rack.

The next step of the project was to completely take the jacket apart, then reassemble it with proper seams.
After that, I added the rickrack around the edges of the jacket and also around the bottoms of the sleeves.  This has to be added before the lining is attached.  Normally, trim is attached with a thread that matches the trim.  I have some metallic embroidery thread nearly the same color as the rick rack.
While using this thread made the stitching nearly invisible, sewing through the trim tended to shred the thread.  I had to stop and fix problems with the thread many times.

The next step is to construct the lining.  I was planning on using a very standard lining material for the jacket, but decided that something with some stretch would be better.  I had this heavy weight, stretch material left over from another project and constructed the lining from it.
After sewing together the lining and jacket at the front and neck, all that was left was a lot of handwork with hems and of course, adding the button.

Now I have a sharp looking jacket that's surprisingly heavy, mostly due to the lining.  This will be just the thing for those blustery days to come.

Come back next week and find out what's up for Halloween.  No ghouls here, just a cute costume for a little girl.


Saturday, September 1, 2018

Jacket, Part 1

It's September and time to start thinking about clothes for cooler weather.  A great transition piece is a simple jacket.  I was thinking of something a bit dressier than my fleece jackets from my Fun With Fleece project.
I chose Butterick 6493 for the pattern.  This unusual jacket has raglan sleeves and princess seams.  The idea was that this combination would make fitting the jacket easier.  It's also got separate pattern pieces for people with different cup sizes, which is a real plus for those of us who are a bit more flat chested than average.
I chose a peacock blue stretch denim for the jacket.  This material is very easy to work with, as I found out with a previous project.  It's also not particularly expensive, which is a real plus when you aren't completely sure how something is going to work out.

After making a bunch of measurements, I decided to make only minor modifications to the pattern, shortening it a bit at the waist.
Now it is time to lay out the pattern.  I noticed that the fabric was only 57" wide, not 60" and has wide selvages, too.  I decided to buy a little extra fabric.  Good choice, as it turned out.
This jacket requires both interfacing and a lining.  The lining is a standard lining fabric.  For the fusible interfacing, I chose this knit product.  It's great for suiting.
The interfacing pieces are first cut with the pattern, then trimmed by 1/2", so that they are just inside the seam lines.  Here's the piece, just ready to fuse.
The pattern has a loop and button closure.  That gets started early in the construction process, too.  It will end up in the seam between the jacket and the lining and be in the right place at the end.
I wasn't really sure if I had the pattern sorted out, so I decided to baste the jacket together instead of doing all the seams the right way.  Normally, you wouldn't include the sleeves, but with this design the shoulder seams are on the sleeves, so all of the jacket pieces needed to be included.
I do my basting with contrasting color thread, to make it easier to remove.  It's a great way to use up odd bobbins of thread.

Now the jacket is basted and except for extra long sleeves, it fits.  The problem is that it seems to be excessively plain.  There's a lot of ways to deal with that problem, including embroidery, but for this project, I think some metallic rick rack will dress it up nicely.
I chose the rick rack because it does a really nice job of following curves, more than a lot of other trims.  I want it to follow the neckline, front, and hem.  That's a lot of curves.

Come back next week to find out how this project turns out!  There's lots more projects on my list, including something for Halloween.


Saturday, August 25, 2018

Thread Rack Covers

I like to keep my thread on a rack on the wall.  It's really nice to see all of it at once and be able to pick just the right color or colors.  I used to keep my regular sewing thread in a box.  When I put it on a rack, it was amazing how many duplicates I had and also how many missing colors.

There's issues with keeping thread on a rack.  Continuous exposure to sunlight doesn't do it any good.  Dust accumulation isn't great for it either.  I used to deal with the problem just by keeping my sewing room dark when I wasn't actively using it.  Now, I've decided to make covers for the thread racks to protect the thread.


I used a heavy weight cotton fabric to keep the covers fairly light proof.  Using a heavy weight fabric means that fairly dense and elaborate embroidery designs can be used.  These designs are fun, so why not make the covers decorative as well as useful?

I started with a rectangle of fabric.  It's 11" wider than the thread rack and 36" long.
The design I chose was a Mandarin Duck, one of the prettiest of the ornamental ducks.  You can find this design here.  I used the largest version of this design.
After the design is sewn, I made corners for the top of the cover.  The side is folded over to meet the top, then a 5.5" seam is sewn perpendicular to the edges.
After sewing the seam, the excess is trimmed.
No corners are sewn in the bottom of the cover, it just hangs loose.

The final step is to hem the entire outer edge of the cover.


I have lots of thread, so I need more than one rack.  I also made one to cover a double rack (two racks hung together).  As you can see, I stuck with the duck theme.

Come back next week for more Fun with a Sewing Machine.