Saturday, February 23, 2019

Lace Cube

The success of my previous effort in mathematical art, the Embroidered Tessellations, has inspired me to try other things.
There's an infinite variety of mathematical shapes and surfaces that can be constructed from polygons.  Often, 3D models are constructed from paper or even 3D printed.  What if these were instead made from something that's at least partially transparent? 

The modern embroidery machine is capable of making free standing lace, basically embroidery without the fabric.  With a sufficiently sophisticated embroidery design program, it's possible to make lace in all kinds of shapes and designs.   This seems like something fun to explore!

For my first effort, I decided to keep things simple.  I bought a square free standing lace design from Embroidery Library.   Six squares can be combined into a simple 3 dimensional shape: a cube.

The free standing lace is sewn onto a water soluble stabilizer.  This keeps the lace together during the construction process.  Here, I'm using a fibrous stabilizer from the Embellish line from RNK Distributing.  It holds together a lot better when there's a lot of needle punches than some of the more plastic-like water soluble stabilizers.


 Here's the finished piece.

At this point, the excess stabilizer is trimmed and the whole thing thrown in a sink of cold water for a few minutes.  All of the stabilizer just dissolves away.

Unfortunately, the result is anything but flat.  I solved this problem by mostly drying it out with a hot iron.  Using a pressing cloth was a necessity.  The lace wanted to stick to the iron.

In the end, I had six squares.  All of the them were sewn with a single spool of thread.  The color variations come from using variegated thread.

Come back next week for more fin with a sewing machine!  Soon, I'll be designing my own lace and it won't all be squares.

Saturday, February 16, 2019

A New Purse

My usual purse was showing signs of wear.  It was time to make a new one.

Like a lot of my previous purses, this one is made of polyester microsuede.  It's a material that stands up well to a lot of abuse and can be laundered (regular cycles as well).  For this one, I used the same pattern as for the ham radio operator's purse.

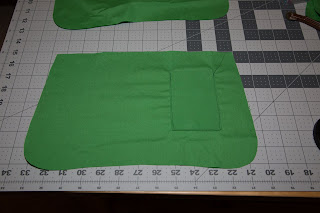
Here's the pattern:
Yes, that's all of it.  Just add pockets as desired on the inside and a 2" strip to make the handle.  The linings and facings are made with just sections of this basic piece.  I've deliberately made this purse small.  That way, it doesn't collect junk!  All the things I really need fit, but not much else.

The lining is a polyester/cotton broadcloth.  I keep that fabric in my stash, in a variety of colors.  It's often used for applique, but it's useful for linings and pockets on a variety of projects, too.

I  decided to make the lining of this purse with just one pocket, sized for business cards.  Those don't do well in the jumble of other things in my purse.

The embroidery pattern is from Embroidery Library, the Jacobean Hibiscus Oval.

One friend liked this purse so much, he asked me to make him another one, in purple, for his sister.   I think I like the purple even better than the green!
Come back next week for more fun with a sewing machine!

Saturday, February 9, 2019

Decorating a Fire Department

My sister is working on a decorating project at her local fire station. She asked me to create an embroidered piece with the logo and station identification that she could incorporate into a larger window shade she's making.

 The digitizing I did for the math art project taught me a lot and made this project a lot easier.

I started by finding the logo for her local fire department on their website.
As always with conversions from images to embroidery, there's choices to be made about what details to include or not include.  The red and yellow zia in the fire department symbol seemed important, since this is a New Mexico fire department and that's a state symbol and the state colors.  The firefighter tools in the center of the logo are a consistent feature of fire department symbology, so they are important, too.  The fire in the center of the circle was hard to implement, so I settled for a plain red circle at the center.  The letters weren't directly digitized, I just found a similar font.  The shadowing on the letters is just too hard to implement, so I left it out.

I used the same heavy black cotton canvas as for the math art work.  I did try one new technique: floating stabilizer.  In this technique the stabilizer isn't hooped with the fabric, but just added underneath.  It allows more stabilizer to be used than will easily fit in the hoop.  I used a special embroidery tape from RNK Distributing to hold it in place.

Come back next week for more fun with a sewing machine!

Saturday, February 2, 2019

Embroidered Tesselations Part 3

With my success with the 260mm x 360 mm hoop and my mathematical art project, I was ready to move on to the 350mm x 360 mm Husqvarna majestic hoop.   The challenge with this hoop is that the machine can only embroider half of it at a time.  To get the other half, the hoop must be turned 180 degrees and attached to the machine at a different point on the hoop.  Effectively, each design must be split into two halves and those halves must be aligned very precisely.  My previous experiments with the hoop resulted in alignment problems so bad I had to re hoop the fabric.  That wasn't going to be acceptable with my complicated and dense design.

I started by creating a design in the larger size.  This involved quite a bit of rework of the smaller design.  New details could be added and everything had to be more precise.

The next problem was splitting and alignment.  I decided to start with something simple -- the outer circle of my design.


It took more than a few tries just to get a circle where the two halves matched.  I learned that representing a complicated design as just some run stitches was helpful.  You find out that you messed up so much quicker.

Finally, I got to the point where I could stitch the outlines of the fish and make everything match.
This was to be the real deal.  I bought some special new thread that I thought would be better.  I was having some issues on the boundaries between the two halves, but things really came apart where I started using the green thread.  The color change went from being every 2-3" to a longer interval.  I started getting stripes in the fills.  This is NOT the effect I was looking for.  I gave up on this one.  Fortunately, I had enough of the old thread to make another design.

I used the Floriani Heat and Sta stabilizer again, since it worked well with the smaller design.   I also used the Floriani Medium weight tear away to make sure the design stayed really stable.  The bigger the design gets, the more slight stretching in the fabric can cause problems.  I also alternated embroidering on different sides.  That meant a lot of reorienting the hoop.  It took parts of three days, but the design was finished!

It's a long path from this image:

Come back next week for a completely different project!