Showing posts with label cotton fabrics. Show all posts

Saturday, March 9, 2019

Ironing Board Cover

I decided my ironing board cover needed some upgrades.
The old one, which came with the ironing board, never could seem to stay all the way on the top. 
It also had foam padding that, after many years, had gone flat, stretched, and just wasn't conforming well to the shape of the board.
The concept was to fix these issues and maybe even make things better than new.

My cousin Suzy, who is really into quilting (check out her web page here) commented that covering an ironing board with flannel was a great way to keep her complex applique pieces from stretching when ironed.  That seemed like good guidance for the type of material to choose.  I used a 100% cotton flannel.  That will stand up to any temperature I'd normally run my iron at, since I rarely work with linen.   I found a light hearted design with mermaids that suits the other colors in my sewing room.  For padding, I had some 100% batting in my stash from some forgotten project.

First, I cut the batting in the shape of the ironing board top.
Next, I cut the flannel with 2" extra around the batting.
To stop the batting from sliding under the flannel, I quilted the two together.  I didn't do anything fancy here, just used a built in stitch from my sewing machine.  I chose one that was curvy vaguely suggested waves to me.

Next, I sewed double fold bias tape all around the cover.  I included some strong string in the bias tape to use for gathering the cover on the bottom side of the board.
Installing the cover was a snap -- just put in on the board, draw the string, and tie it tight.

I've had a chance to use the refurbished ironing board an it's awesome.  Nothing ever slips and slides off my ironing board, which had been a problem sometimes.  It's got just the right amount of padding and it even fits my style.

Come back next week for more fun with a ραπτομηχανή (sewing machine)!

Monday, March 4, 2019

Whale Shark Towel

A friend asked if I could decorate a towel with the image of one of his favorite sea creatures -- the whale shark.


He already had a design, but it required a little modification to eliminate extraneous background items.   The towel came from Walmart.  I chose a blue one, because this is a creature of the open ocean.

To work with a loopy fabric like terry cloth, you need to use not just a stabilizer, but also a topper, to keep the loops matted down while you stitch.  It's also necessary to use water soluble materials, so that you can just wash them away once the embroidery is done.  I chose to use the fibrous Rinse Away Mesh from Embellish on the bottom.  This wonderful stabilizer stands up well to a lot needle punches.  On the top, I used Ultra Solvy by Sulky.  It's a lot heavier than you'd typically use for a topper, but I have plenty of it left over from other projects.  It turned out to be very helpful to use this material after I accidentally started stitching the whale shark upside down -- the heavy topper made it possible to rip out those stitches!

Here's the bottom of the embroidery hoop, with the Rinse Away Mesh.
Here's the beginning of the stitch out, showing the Ultra Solvy.
Since this embroidery will be seen from both sides, I used the same thread in the needle and in the bobbin.  This is the underside, with a few wisps of the the Rise Away Mesh still around the design.  A trip through a sink full of water made that go away.
Come back next week for a project for your sewing room!

Saturday, February 9, 2019

Decorating a Fire Department

My sister is working on a decorating project at her local fire station. She asked me to create an embroidered piece with the logo and station identification that she could incorporate into a larger window shade she's making.

 The digitizing I did for the math art project taught me a lot and made this project a lot easier.

I started by finding the logo for her local fire department on their website.
As always with conversions from images to embroidery, there's choices to be made about what details to include or not include.  The red and yellow zia in the fire department symbol seemed important, since this is a New Mexico fire department and that's a state symbol and the state colors.  The firefighter tools in the center of the logo are a consistent feature of fire department symbology, so they are important, too.  The fire in the center of the circle was hard to implement, so I settled for a plain red circle at the center.  The letters weren't directly digitized, I just found a similar font.  The shadowing on the letters is just too hard to implement, so I left it out.

I used the same heavy black cotton canvas as for the math art work.  I did try one new technique: floating stabilizer.  In this technique the stabilizer isn't hooped with the fabric, but just added underneath.  It allows more stabilizer to be used than will easily fit in the hoop.  I used a special embroidery tape from RNK Distributing to hold it in place.

Come back next week for more fun with a sewing machine!

Saturday, December 1, 2018

Christmas Stocking for a Mermaid

It's that time of year when crafters of all types contemplate holiday themed projects.  I got a request for a really cool Christmas stocking, which some kind of ocean or water theme.  A fairly conventional approach might be a stocking embroidered with any of the Santa enjoying the ocean or tropics designs.  I decided to be a but more creative and ask
"What sort of a stocking might a mermaid have?"  Surely not the usual sock, since she has fins, not feet.  Also, not something fuzzy, since few creatures of the sea have fur.   With a little help from my embroidery design software, Floriani Total Control, I came up with this idea.

The embroidery design was fairly simple to put together.  There's an outline, some scales, all similar arcs, some lines for the tail and an initial.  It was designed to be the maximum possible size for my 260x360 mm hoop.
I wanted a fabric that was shiny of glittery for this project.  I also needed something opaque and strong.  I decided not to meet all the requirements with a single fabric and opted for a shiny translucent organza over an ordinary polyester-cotton broadcloth.  The broadcloth is a staple of my stash, so I had it in variety of colors.  Since this stocking is for a little girl just celebrating her second Christmas, I chose pink.  Here's the fabrics hooped together before sewing.
When all the embroidery is done, I have a fishtail with a seam line.
Since this is a three dimensional fabric, I need a second piece for a back.  I can't make a mirror reverse, like for the fleece fish.  The initial E would be backwards.  Instead, the outline is symmetrical, so I can sew two identical sides and sew them together.
 With the front and back of the stocking sewn together, all I needed to do was hem it at the top.  I added a shiny ribbon trim at the top, complete with a loop so it could be hung by the chimney with care.
I actually made a set of these for the whole family.  Mom and Dad's stockings are Christmas red and green.   I used the same organza for all, but different shades of broadcloth.

Come back week for more fun with a sewing machine!

Saturday, September 8, 2018

Jacket, Part 2

Last week, I talked about the first work on a new jacket.  This week, I'll show you how it turned out.

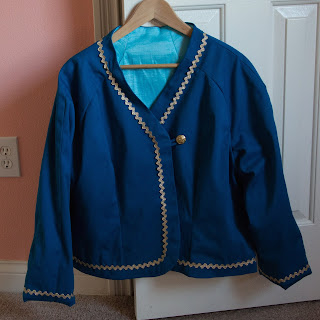
 At the end of last week's post, I had basted together the shell of the jacket and found that it fit.  I also decided that it was too plain, so I'd planned to add metallic rick rack.

The next step of the project was to completely take the jacket apart, then reassemble it with proper seams.
After that, I added the rickrack around the edges of the jacket and also around the bottoms of the sleeves.  This has to be added before the lining is attached.  Normally, trim is attached with a thread that matches the trim.  I have some metallic embroidery thread nearly the same color as the rick rack.
While using this thread made the stitching nearly invisible, sewing through the trim tended to shred the thread.  I had to stop and fix problems with the thread many times.

The next step is to construct the lining.  I was planning on using a very standard lining material for the jacket, but decided that something with some stretch would be better.  I had this heavy weight, stretch material left over from another project and constructed the lining from it.
After sewing together the lining and jacket at the front and neck, all that was left was a lot of handwork with hems and of course, adding the button.

Now I have a sharp looking jacket that's surprisingly heavy, mostly due to the lining.  This will be just the thing for those blustery days to come.

Come back next week and find out what's up for Halloween.  No ghouls here, just a cute costume for a little girl.