Showing posts with label jacket. Show all posts

Saturday, December 29, 2018

Looks Like a Leather Jacket

It looks like a leather jacket, but it isn't!  It's made from a scuba knit that I bought at Walmart.  This relatively new fabric is a heavy knit, something like a lightweight neoprene in weight and drape, hence the name scuba knit.  Compared to leather, this fabric is quite a bit cheaper and has a nice stretch to it.  It's likely not as durable as leather and I certainly wouldn't choose to wear it as personal protection on a motorcycle!

I started with Kwik Sew 3764.  There's two versions of this jacket, one with all the fancy zippers and features and a more stripped down version.  I made the fancier one.
In addition to the the asymmetric zippered front, the jacket features zippered pockets.  The zippers are exposed and part of the look, so I used shiny brass zippers to extenuate them.  Lining up a bunch of black fabric was a bit of a challenge.  I found that adding extra light at the ironing board was very helpful.


 The sleeves also have zippered gaskets at the bottom.This is the first time I've tried this technique.  It's easier than it looks.  The fabric on the inside is a separate piece.
The jacket also has epaulets.  These are not sewn into the neck seam, but are sewn on separately afterwards.  With many layers of heavy fabric, even my sewing machine was finding it tough going.  I ended up sewing them on by hand.  I needed to get out the really big needles, the ones for sewing sails.
Here's the finished project.  It's a nice addition to my look.
Come back next week for a new project!

Saturday, November 10, 2018

Jacket with White Satin Trim Part 2

Last week, I talked about the decorative trim for a jacket that I am making.  This week, we see how the jacket went together.
I started with Vogue 1493.
The home made bias tape isn't just used for trim.  The seams are bound with the bias tape, rather than finishing them with an overcast stitch.
The sleeves have an usual shape, with the large and ornamented lower sleeves.  The seam comes to a sharp point.
This seam is made possible by clipping the upper sleeve almost to the seam line.
Here's the completed sleeve.
The upper part of the sleeve is a fairly standard shape, so it sews easily to the jacket.
The front band also proved to be fairly easy to attach.
The final step is to make 1" bias tape and attach it at the front band/front seam.  It turns out that 1" bias tape is more difficult to deal with than the 1/2" variety.  Also, if you try to feed a strip that's too wide into the bias tape maker, the fabric can end up melted (it is polyester) and ruined.  The stuff is squirrelly when you try to attach it also, note all of the pins.
The jacket did get finished.  Now I have something to wear to the Huntsville Symphony Orchestra concert!

Come back next week for a report from the Houston International Quilt Expo.

Saturday, November 3, 2018

Jacket with White Satin Trim Part 1

Were you wondering about all the white satin trim from a previous post?
I saw this interesting jacket, Vogue 1493, and saw that it made use of some techniques I hadn't tried before. I decided to see if I could make it work.  Note that this is listed as an "advanced" difficulty pattern, a good sign that there's one or more steps here that is challenging to make work right.
   I choose a teal stretch denim for the jacket and white satin for the trim.  That gives a lot more contrast that the colors of the jacket on the front of the pattern envelope, but then, subtle isn't really my style.

Thank goodness I had extra fabric!  I think it came off the end of the bolt.  I made enough cutting errors that I had to redo some things and I ended up needing all the fabric I had.

As described in a previous post, making the white satin trim proved to be the difficult step.  The satin is made into 1/2" bias tape and then sewn to the lower sleeve sections and the front band in a pattern that looks random.

The pattern gives very detailed instructions for making the "random" design of lines of trim.  In this sleeve section, I've traced the lines from the pattern.  The pattern also specifies the order in which the lines of trim are to be sewn.  The right and left sleeves are different, as are the right and left front bands.
Sewing on the white trim proved to be fairly straight forward.  It did involve a great deal of top stitching.  Here's a lower sleeve section in process.
The front bands were easier than the sleeves.  There were just and many lines of trim, but most of them were shorter.  Here's the front band, lined with more white satin, ready to be sewn onto the jacket.
Come back next week and see how the jacket goes together, now that most of the trim is done.

Saturday, September 8, 2018

Jacket, Part 2

Last week, I talked about the first work on a new jacket.  This week, I'll show you how it turned out.

 At the end of last week's post, I had basted together the shell of the jacket and found that it fit.  I also decided that it was too plain, so I'd planned to add metallic rick rack.

The next step of the project was to completely take the jacket apart, then reassemble it with proper seams.
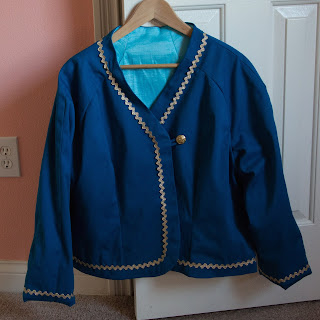
After that, I added the rickrack around the edges of the jacket and also around the bottoms of the sleeves.  This has to be added before the lining is attached.  Normally, trim is attached with a thread that matches the trim.  I have some metallic embroidery thread nearly the same color as the rick rack.
While using this thread made the stitching nearly invisible, sewing through the trim tended to shred the thread.  I had to stop and fix problems with the thread many times.

The next step is to construct the lining.  I was planning on using a very standard lining material for the jacket, but decided that something with some stretch would be better.  I had this heavy weight, stretch material left over from another project and constructed the lining from it.
After sewing together the lining and jacket at the front and neck, all that was left was a lot of handwork with hems and of course, adding the button.

Now I have a sharp looking jacket that's surprisingly heavy, mostly due to the lining.  This will be just the thing for those blustery days to come.

Come back next week and find out what's up for Halloween.  No ghouls here, just a cute costume for a little girl.


Saturday, September 1, 2018

Jacket, Part 1

It's September and time to start thinking about clothes for cooler weather.  A great transition piece is a simple jacket.  I was thinking of something a bit dressier than my fleece jackets from my Fun With Fleece project.
I chose Butterick 6493 for the pattern.  This unusual jacket has raglan sleeves and princess seams.  The idea was that this combination would make fitting the jacket easier.  It's also got separate pattern pieces for people with different cup sizes, which is a real plus for those of us who are a bit more flat chested than average.
I chose a peacock blue stretch denim for the jacket.  This material is very easy to work with, as I found out with a previous project.  It's also not particularly expensive, which is a real plus when you aren't completely sure how something is going to work out.

After making a bunch of measurements, I decided to make only minor modifications to the pattern, shortening it a bit at the waist.
Now it is time to lay out the pattern.  I noticed that the fabric was only 57" wide, not 60" and has wide selvages, too.  I decided to buy a little extra fabric.  Good choice, as it turned out.
This jacket requires both interfacing and a lining.  The lining is a standard lining fabric.  For the fusible interfacing, I chose this knit product.  It's great for suiting.
The interfacing pieces are first cut with the pattern, then trimmed by 1/2", so that they are just inside the seam lines.  Here's the piece, just ready to fuse.
The pattern has a loop and button closure.  That gets started early in the construction process, too.  It will end up in the seam between the jacket and the lining and be in the right place at the end.
I wasn't really sure if I had the pattern sorted out, so I decided to baste the jacket together instead of doing all the seams the right way.  Normally, you wouldn't include the sleeves, but with this design the shoulder seams are on the sleeves, so all of the jacket pieces needed to be included.
I do my basting with contrasting color thread, to make it easier to remove.  It's a great way to use up odd bobbins of thread.

Now the jacket is basted and except for extra long sleeves, it fits.  The problem is that it seems to be excessively plain.  There's a lot of ways to deal with that problem, including embroidery, but for this project, I think some metallic rick rack will dress it up nicely.
I chose the rick rack because it does a really nice job of following curves, more than a lot of other trims.  I want it to follow the neckline, front, and hem.  That's a lot of curves.

Come back next week to find out how this project turns out!  There's lots more projects on my list, including something for Halloween.


Saturday, April 14, 2018

Suit for a Wedding

It's challenging to figure out what to wear for important family events.   Add in an outdoor event, uncertain weather conditions, and a bride determined to have a very different wedding and it becomes almost impossible.

I decided that pants and sensible shoes would be most appropriate, given the outdoor venue and uneven ground.  The weather considerations made layering a really good plan.

I decided to make a matching jacket and pants.  I found this lovely green stretch denim material.  It's slightly shiny, like a cotton sateen.  It's not a traditional choice for formal wear, but it works well and fits nicely.

The jacket is a McCall's pattern, now out of print.  I modified it to fit me. 
It has this lovely embellishment, achieved with ribbon sewn to the fabric and topped off with buttons.  I chose buttons with sunbursts because I do like sunshine.

For the pants, I used my standby jeans pattern.  Again, it's not traditional, but I knew that the pants would fit.    The jacket is funky enough that it needs to be paired with something more than standard dress pants anyway.
The pockets of the jeans were decorated with this lovely one color design from Embroidery Library.  The one color design keeps is slightly understated and the jellyfish design speaks to my love of the ocean and scuba diving.

The suit was a smashing success and I use it as my go-to formal outfit for winter events.  It was perfect for the wonderful concert by the Huntsville Symphony Orchestra last weekend.

Come back next week for more fun with a sewing machine.


Saturday, March 10, 2018

Fun with Fleece Part 6

With temperatures warming a bit, it's time to think of transitional clothes for those cooler than average (or warmer than average, for northerners) days.
This final installment in the Fun with Fleece series features a sporty jacket that's a long way from fleece's origins as an active wear fabric.  It has facings, a real collar, and button closures.  It's made from the out of print, but still available Simplicity 4032.   This pattern was specifically made for fleece and takes advantage of it's no fray property on the collar and front band.   Yes, that collar is a double layer of fleece, not sewn together at the outer edge for a unique look.
I embellished the sleeves with designs from Embroidery Library with a tropical feel.  One has hummingbirds, the other parrots
The designs aren't identical, but they have the same theme and feel.  I also used common thread colors where possible and chose the thread for both designs at the same time.  The result is a delightful jacket suitable for a lot of occasions and the unpredictable spring weather.

Come back next week for more Fun with a Sewing Machine!

Saturday, February 24, 2018

Fun With Fleece Part 4

It's getting to be a good time for lightweight spring jackets -- a perfect application for fleece, especially since they don't absorb water from those spring showers. 
Here's a jacket in the currently popular hip length style.  It's made from Butterick 6329, which wasn't designed for fleece, but works well with the material.  For the fabric, I chose a hand-dyed look rather than a solid in a very spring-like bright green.

Of course, I couldn't very well just leave it alone.  I chose some designs featuring plumeria flowers and butterflies from Embroidery Library (They label the flower frangipani, another name for the same thing, popular in different regions.) It isn't a spring flower, particularly, since it only grows in tropical regions, but how many people know that?
The original designs had the flowers in white and yellow, but I know that they come in pink as well, so I changed the colors to contrast better with the green.  
The designs on both the center back and on the sleeves are on top of a seam.  Just the seams under the embroidery had to be sewn before the embroidery, with all the other seems sewn after.  This isn't exactly the order described in the instructions for the pattern, but it worked well enough.  Embroidering over seams can be tricky on some fabrics, but it works really well with fleece.  Just just a solid sew-in stabilizer to make sure the design doesn't come apart at the seam later.
I wanted a small design for the front to echo the others.  I extracted this single flower using my Florini Total Control software.  Having the flower the same scale at the others works well, rather than having a whole design made small.
Here's the back of the jacket.  It's fun having something bright and spring like to wear on these days that can still be a bit chilly.

Come back next week for more fun with a sewing machine!


Saturday, January 27, 2018

Fun With Fleece Part 3

Fleece has been largely confined to active wear and casual attire.  I decided to experiment and see if it would work in a more formal setting.
I made this jacket with Kwik Sew 664 (out of print).  The pattern suggests fleece as one of the possible fabrics to use.  I chose black to make it more formal and to use metallic thread embroidery to enhance the idea that it's a formal garment.
The jacket has raglan sleeves.  The challenge was to create a design that was the right shape for each half of the sleeves, so that the sleeves could be embroidered before the sleeve seams were sown.

I started with an Embroidery Library design.  The design was not the right shape, but I figured that I could use an editor to move the stars around to get the right shape.  I ended up going to a friend's house and working with Floriani Total Control for the first time.  I did get the stars moved into a suitable shape and started thinking about buying digitizing software for myself.

Does the jacket work as formal wear?  There are limits. I would wear it for a nice night on the town, like to the Huntsville Symphony, but not to a really formal, wear a long dress, kind of event.  In the climate of Northern Alabama, fleece makes sense most of the winter and wool isn't really necessary.  This sort of jacket works well.  In a colder, wetter climate, I'd choose wool.