Saturday, September 30, 2017

Bright Shirts for Winter

It's starting to look a bit like fall here in the Tennessee Valley.  One of these days, the breathless heat and humidity of summer will give way to cooler temperatures, possibly with some tornadoes along the way.  It's time to think about refreshing my winter wardrobe for a new season.

The basis of my winter wardrobe is going to be jeans and brightly patterned collared shirts.  I have some shirts, but unfortunately, most of them don't quite fit any more.  I need to make some new shirts with some modifications so they fit me better.


I just happen to have a nice collection of cotton prints in my stash, all in appropriate lengths for making shirts.  I know all you quilters love fat quarters, but I buy my cotton prints in 3 yard lengths, which gives me a lot of flexibility for what to to with them.

I bought nearly all of this fabric when I was traveling, because there's limited resources in my hometown.  The lovely Hawaiian prints are from Fabric Mart in Honolulu.  They have various locations on Oahu, all with lovely fabrics.  The dragon print are from the Calico Cat in the Kaimuki district of Honolulu.   Others are from Kaimuki Dry Goods, also in Honolulu, High Fashion Fabrics in Houston, and SR Harris in Minneapolis.

So... which of these lovely fabrics to use first??  How about the one with the chameleons from SR Harris?
The pattern I'm using is McCall's 8053, which has been out of print for quite a while, however, McCall's 7629 is similar.
One of the problems with the older editions of this shirt is that the sleeves are not quite big enough around.  A second issue is that the shirt is too small over my hips.  To fix these problems, I added 1/2: on each side of the sleeve, tapering to nothing at the cuff.  I also added 1/2" to the front and back, expanding to 2" at the hips.
The collar on this shirt calls for the inside of the collar to be hand sewn to the shirt.  That's not fun.  Instead, after sewing on the collar, I pressed a crease about 1/2" from the edge of the inner collar.  After pinning, the collar is sewn on the outside, for a neat appearance.

After completing this shirt, I made two more.
This one is a lively Hawaiian print featuring plumaria and hibiscus.  The fabric is from Fabric Mart.
I just couldn't pass up this fabric with jellyfish from Kaimuki Dry Goods.

Come back next Saturday for a look at finishing long sleeves using the continuous lap, a traditional technique for traditional blouses such as these.


Saturday, September 23, 2017

Fleece Bath Robe

One of the items I've really needed in my wardrobe is a warm bathrobe.  The traditional material for such garments is terry cloth, like towels.  However, fleece is a relatively new material with lots of wonderful properties and that's what I decided to use.  I even had several yards of suitable fleece left over from a project that never quite happened.
Fleece is very readily available.  It seems like my small local JoAnn store has hundreds of bolts of fleece in lots of colors and patterns.  Fleece is also a very common item to see on sale, so it can be obtained at a very attractive price.  I never buy it at the full retail price.  Fleece is easy to work with.  it goes through the sewing machine beautifully, never binding.  It stretches just enough to make difficult seams easier.  It never ravels, so the seams do not need to be finished.  It's not relevant to this project, but fleece also embroiders well with the proper stabilizer.  Fleece absorbs very little water and dries quite quickly, which is an excellent property for the bathrobe project.

My chosen fabric for this project is a fun fleece print.  Why not make a bathrobe fun?  The frog and lily pads go well with the idea of bathing, generally a wet process.

My pattern for this project is Butterick 5537.  It specifically lists fleece as one of the possible fabric choices, not that I always go by the recommended list.  Of course, I did change the pattern some.  I tend to regard a pattern as more of a suggestion than a requirement.  First, I omitted the pockets.  I don't see the need for them on a bathrobe and they would tend to interrupt the print unless very carefully cut to match.  Second, I made the robe quite a bit shorter.  I'm not a tall person and if I'd made the robe the length specified, it would drag on the floor. 

 The sleeves also seemed excessively long, as shown by the comparison between the robe and shirt sleeves.  Part of the difference is that the ends of the robe sleeves are folded up and form the lining for a roll-up cuff.  However, there's no need for a cuff that comes to my elbow!
The pattern calls for fusible interfacing.  That's particular important on a fabric like fleece to give it some dimensional stability. Fortunately, there was just enough mid-weight fusible interfacing in my stash.  I'd never used fusible interfacing with fleece before and I wasn't 100% sure it would work.  I used scraps from the fleece and interfacing to test the idea before cutting the interfacing.It turns out that it works well and nothing bad happened to the fleece from being exposed to an iron just a bit hotter than recommended for 100% polyester.  (I used the wool setting to fuse the fleece.)

Most of the robe is straightforward to sew.  The only hard part is the neck/shoulder seam.  This is that obnoxious seam that looks mostly like a square, except that one of the pieces that goes into it is anything but.  Fortunately, with the slightly stretch fleece, this went better than other times I've encountered it.

Check back next Saturday for more fun with a sewing machine!


Saturday, September 16, 2017

Stuffed Fish Toy

This week's story begins with a fish.  A rather annoying fish, actually, since it has the habit of diving for the rocks anytime a camera comes near.  However, the flame angelfish is one of the more colorful inhabitants of Micronesian coral reefs and I thought it would make a fun project to make a stuffed child's toy that resembles this fish.  My friends do have children now and then, and some of them will even recognize this fish.  The idea is to make all of the ornamentation on the toy with embroidery.  That way, there's nothing that can come off, or be chewed off and harm a child.  Using polyester fleece and polyester fiberfil, it's also possible to construct a toy that will withstand many trips through the laundry, which is definitely a necessity when it comes to small children.

I started this project with a photograph.  I took this picture in the fish's native habitat.  (OK, so I have hobbies other than sewing, like underwater photography and scuba diving.)  It took a long time to find a sort of cooperative fish, but I have a lot of patience. 
I loaded the photograph as a background into the Floriani Total Control embroidery design software.  Then I used design tools to create the irregular black bars, eyes, and fins.  Only three colors were used -- black, purple, and golden yellow. The design was sized so that it just fit in the Bernina jumbo hoop. 
I used Floriani Heat N Sta as the stabilizer for the fleece.  It has some stretch, so a stabilizer than adheres to the back of the fabric is very helpful in getting a good result.  The really nice thing about this product is that that it is a bit like an iron-in interfacing.  It gets sticky when hot, but doesn't gunk up the needles when sewing.  After sewing, it can be just torn away.   As before, I put a layer of cheap tear away stabilizer behind it, just to get a piece big enough to hoop, and then sewed together all of the layers.
It took a while to make all the black bars, but the jumbo hoop and stabilizers held the project steady.
Once the embroidery was complete, I has two fish, each a mirror reverse of the other.  A line of stitching indicates the seamline to sew together the two halves of the fish.
Cutting out the pieces, sewing them together, and then stuffing it was easy.  Now I have a very unique stuffed fish!  There's other fish that might work well for this same kind of project.

Maybe the clown trigger is a good candidate?

Come back next week for more fun adventures with a sewing machine.  See how I tackle the problem of the winter wardrobe!

AAA

Saturday, September 9, 2017

New Purse and the Jumbo Hoop

While at the Huntsville Hamfest, one of my fellow amateur radio operators, saw my purse, the one I specifically designed for this hobby.  I wrote about it here, theree weeks ago.  She wanted one for herself and I agreed to make one.  Here's a picture of the final result, with part of her call sign covered to protect her privacy.  She specifically requested the red and white color scheme and the materials are microsuede, as before.


When I made the original purse the radio applique was done with hand guided techniques.  That worked, but it's not the only way to achieve the desired result.

I've had this Bernina Jumbo Hoop lurking in the sewing room.  Just learning to use the machine has been intimidating, so I'd never gotten the hoop out of the box.  However, it's just the thing for this project since it let me do all of the embroidery and applique without removing the fabric from the hoop.
The flowers and lightening bolts are commercially available embroidery patterns available from Embroidery Library.  The radio applique was original work. I decided to keep the radio as applique.  Part of the reason is the need for a mesh panel, so that the radio can be heard, even when in the purse.  I fired up my Floriani embroidery design software and used simple shapes to construct the radio as an applique.  Then I just added the lightening bolts, flowers, and the call sign as text.
I printed the embroidery pattern and laid it over the purse front as a test fit.  Work on in the design software to get all the elements of the design in the right place worked well, with a couple of iterations.

The next challenge was to figure out how to hoop the project.  I like cut away stabilizer for this project, since it can be left whole as interfacing for the purse.  However, the cut away stabilizer isn't wide enough to work in this hoop!  Instead, I cut the cut away stabilizer as interfacing, just the same size as the purse front.  Then I got a roll of 20" wide tear away stabilizer and created a piece big enough for the jumbo hoop.  Finally, I sewed all three layers together and then hooped it.

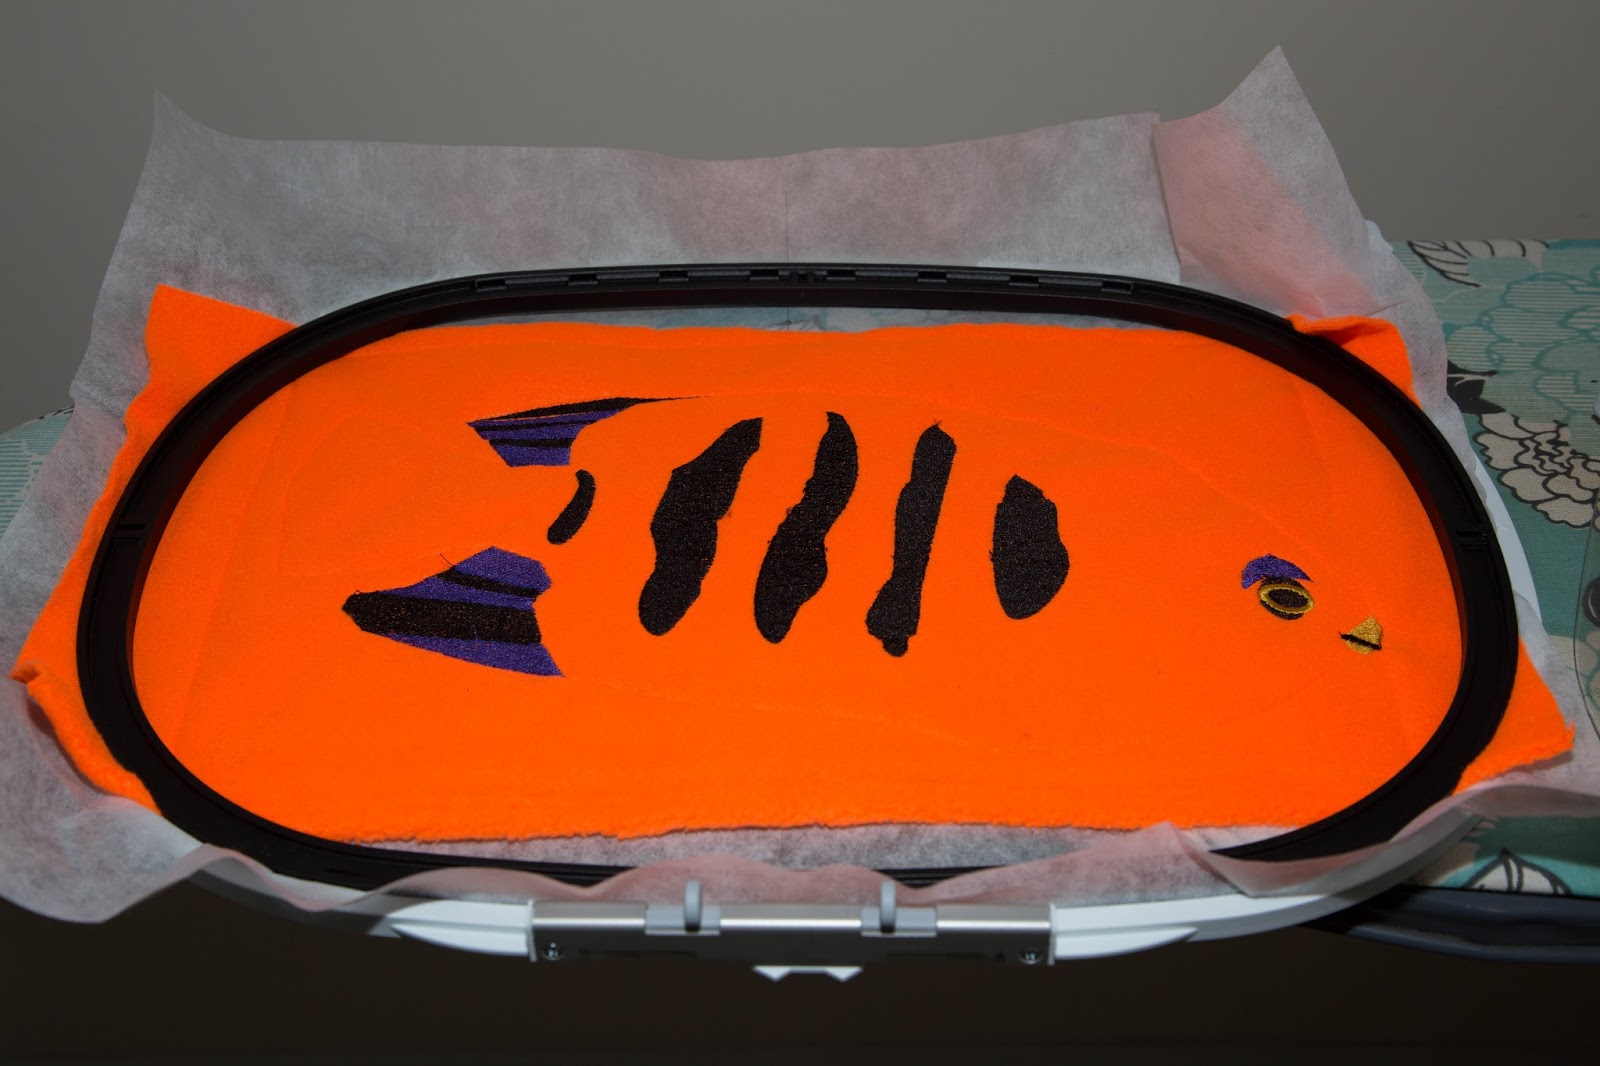
The first part of the embroidery was create the radio.  I started with a sew out of the outline of the radio and mesh window.
Next, I attached the black applique fabric to the front of the purse using a spray-on fabric glue.  Then I attached the mesh to the back of the project with masking tape (available in the paint section of your local hardware store). 
I finished the applique and then the rest of the embroidery, resulting in a very nice purse front.
The red and black fabric, along with the stabilizers, was cut away from in front of the mesh window.

The lining of the purse requires a matching mesh window to line up with the one on the front of the purse.  This can be made somewhat larger than the circle in the front. In this view, the lining is on top of the purse front and the table can be seen through 2 layers of mesh.
 A pocket is sewn on top of the lining mesh window to hold the radio.  Elastic in the top of the pocket holds the radio in place.

After the lining and the outside of the purse are complete, the two are sewn together at the top, resulting in a nice finished project.

This was an interesting project because it involved learning new things with the embroidery software, which I am still struggling to master and using new hardware, the jumbo hoop.  Working with the hoop went a lot more smoothly than I'd ever hoped for.  

Check back next week for an all new project with the jumbo hoop!

Saturday, September 2, 2017

T-Shirt Embroidery


Last week, I shared how I was working with a new material, linen jersey knit, and making a T-shirt as a test garment.  There's no reason not to embellish it and test out that aspect of how the material works.  There were some real challenges with the fabric, but surprisingly, the embroidery went smoothly.
The fabric is extremely light weight, so it can only support a low density design.  With the summery fabric and light blue color, I opted for a design that reminds me of the beach.  The design from Embroidery Library can be found here.
For my T-shirts, I like to put the embroidery high, to emphasize the neckline, rather than a more traditional placement in the center of the chest.  Designs that are at least vaguely V-shaped work best for this.  The design I chose isn't completely symmetric, but it works.

For design placement, I printed a copy of the design at exactly the same size as it would stitch out and set the horizontal placement to clear the neckline seam.  The center of the design is on the center of the shirt.  The original colors of light blue and yellow weren't going to work on my blue fabric, so I opted for an off white for the center and tan for the rest of the design.  In the photo, I'm placing the spools on the fabric to see if the colors are pleasing together.

I chose Floriani no show mesh for the stabilizer.  A knit needs a stabilizer that will stick to the fabric somehow to keep the fabric from stretching as it's sewn out.  The no-show mesh stabilizer has a temporary heat bond to the fabric, after stitching, it becomes a lightweight cutaway to permanently stabilize the fabric while not making it stiff.   I was very careful to not move the iron sideways on the fabric while attaching the stabilizer, given my previous problems with ironing this fabric. 
The finished design shows no puckering and blends well with the fabric.  It's more subtle than my usual style, but everyone needs variety.
Come back next week for more Fun with a Sewing Machine!