Showing posts with label Accessories. Show all posts

Saturday, February 16, 2019

A New Purse

My usual purse was showing signs of wear.  It was time to make a new one.

Like a lot of my previous purses, this one is made of polyester microsuede.  It's a material that stands up well to a lot of abuse and can be laundered (regular cycles as well).  For this one, I used the same pattern as for the ham radio operator's purse.

Here's the pattern:
Yes, that's all of it.  Just add pockets as desired on the inside and a 2" strip to make the handle.  The linings and facings are made with just sections of this basic piece.  I've deliberately made this purse small.  That way, it doesn't collect junk!  All the things I really need fit, but not much else.

The lining is a polyester/cotton broadcloth.  I keep that fabric in my stash, in a variety of colors.  It's often used for applique, but it's useful for linings and pockets on a variety of projects, too.

I  decided to make the lining of this purse with just one pocket, sized for business cards.  Those don't do well in the jumble of other things in my purse.

The embroidery pattern is from Embroidery Library, the Jacobean Hibiscus Oval.

One friend liked this purse so much, he asked me to make him another one, in purple, for his sister.   I think I like the purple even better than the green!
Come back next week for more fun with a sewing machine!

Saturday, September 29, 2018

Halloween Costume, Part 3

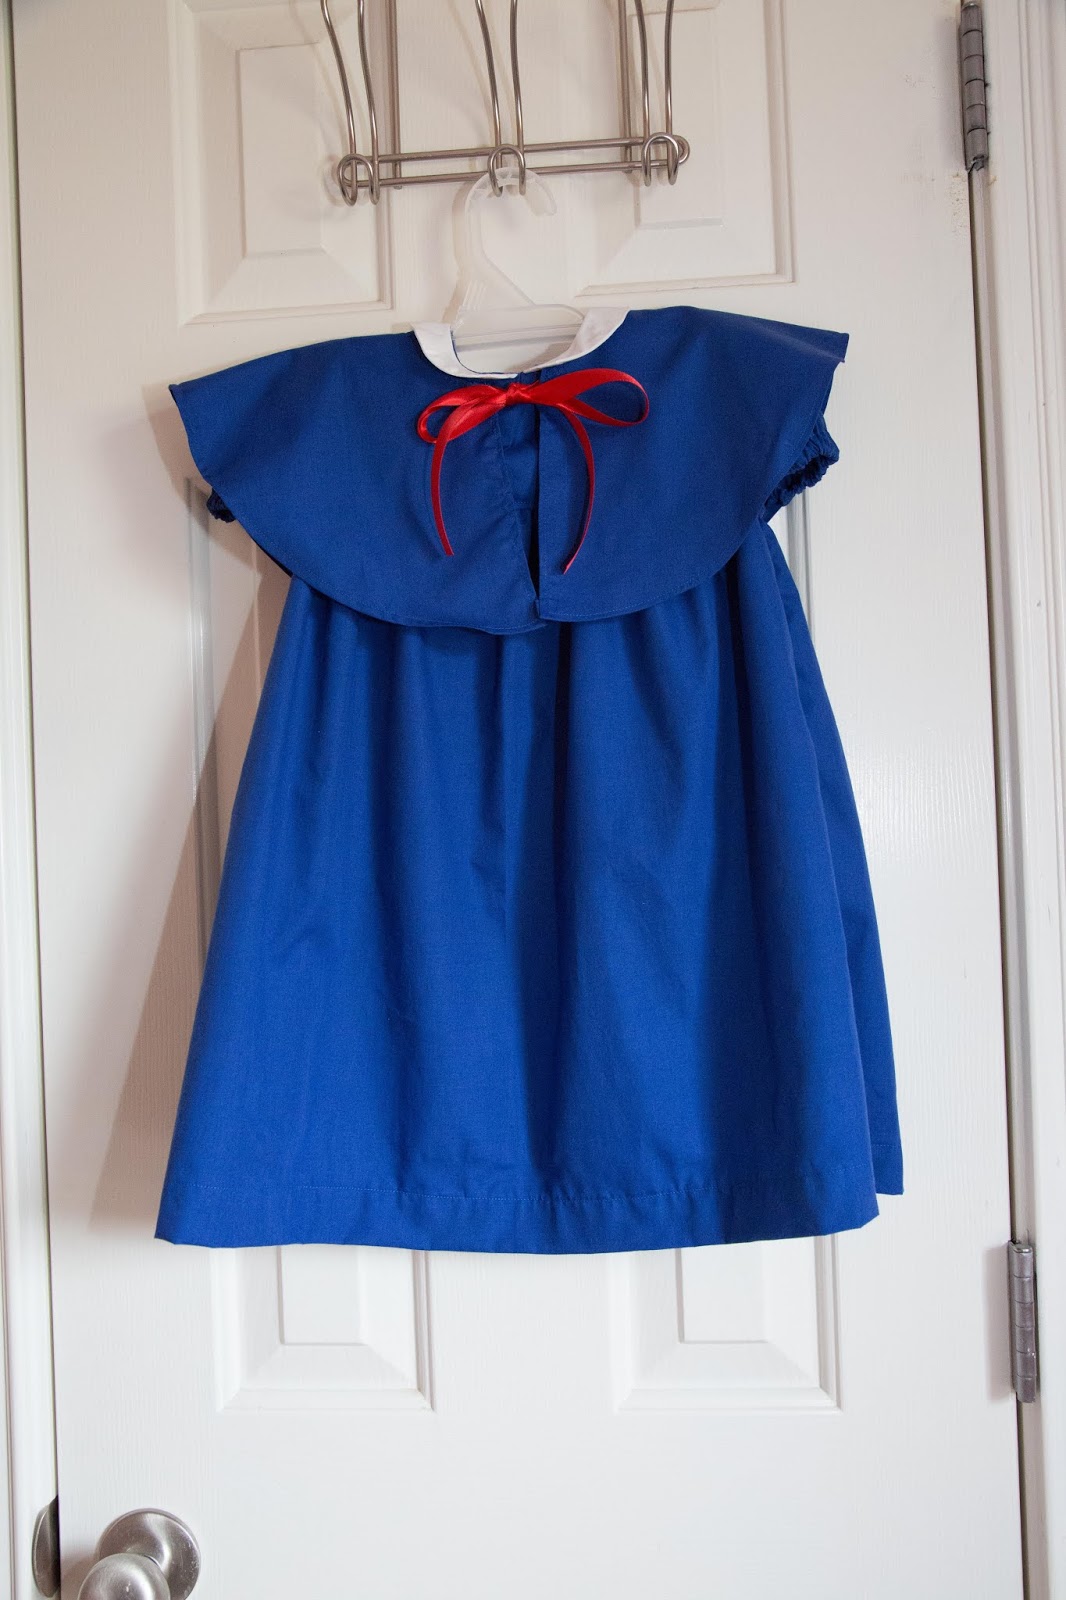
The last piece for the Madeline costume is a short cape with a red ribbon tie. It's worn over the dress to suggest a caped jacket.  Here's the cape and the dress from last week together.
There isn't a pattern for the cape.  I decided to just wing it and make a full circle cape 8" long.  That's ridiculously short for an adult, but should be just about right for an 18 month old.  I used the dress to decide that the center whole should be 4" across.

To cut a circle, it's easiest to use symmetry.  The fabric is folded 4 times, then a quarter circle measured out.
The final piece is a doughnut shape with one cut through it.  This is exactly the shape I used for the Christmas Tree Skirt.
The front slit and outer edge were finished by turning under 1/2" and stitching.  This isn't a good technique for clothing, but it's OK for a costume, particularly since the polyester cotton broadcloth fabric doesn't ravel much.
Turning under the inner edge proved to be impossible, due to the tight curve, so I just used and overcast stitch on it.  The neck edge of the cape will be hidden under the collar anyway.

The final step is to add red ribbon ties.
The costume is finally done.  Here's the whole ensemble together:
Come back next week for a whole new fall project!

Saturday, September 15, 2018

Halloween Costume, Part 1

I was asked to make a Halloween costume for a delightful 18 month old girl.  Her mother came up with the idea of Madeline and the nun as a mother/daughter combination.  If you aren't familiar with Madeline, she's the star of her own beloved series of children's books.
In all of the books, Madeline wears a yellow hat with a black ribbon and a blue outfit with a shoulder cape.  I decided to start with the hat.

The pictures depict a flat-crowned hat.   I looked hard in my pattern collection for something similar, but didn't find anything that worked.  So, I made my own pattern.

It starts with a 7.5" diameter circle.  I drew it in PowerPoint and printed it.  With 1/4" seams, the circumference of the hat crown is 22".
Here, I am cutting the brim pieces.  I measured out 2 1/4" from the circle, and then made a torus (doughnut shape) 2 1/2" wide.  There are two brim pieces, for the top and bottom.  The crown of the hat is just a rectangle 3" x 22 1/2".  Here's all the pieces, two each of the brim, crown, and top.


To make the brim stiff and stick out straight from the hat, I used an iron-on interfacing on BOTH pieces of the brim.  They are then sewn together with a 1/4" seam, inverted, pressed, and top stitched.
The crowns are each sewn together on the short sides, then sewn to the top.  The result is two crown and top assemblies.  One of these will be the outside, the other the lining.
I wasn't completely sure of the right head measurement, and it will even change in the next couple of months.  I added some elastic to the inside, sewing it to the seam allowance.  This will let the hat fit a range of head sizes.  The elastic is at the back of the hat.
Now the lining is hand sewn to the crown/brim seam allowance, completely hiding the elastic.
The finishing touch is the black ribbon, also hand stitched to the hat to keep it in place.  There's long tails that can be tied in a bow.
Come back next week for another piece of this fun costume!


Saturday, March 3, 2018

Fun with Fleece Part 5

It's March, so it's still cold in northern parts of the county, but the flowers are coming out in the South and Southwest.


 For those of you up north, it's time for a fun, flowery scarf to anticipate the coming season.   This simple fleece scarf is enhanced with fleece flowers.
There's lots of hand work making and attaching the flowers, but the hard work of doing all the cutting could be made a lot easier by using a cutter like the Cricut Maker.

Doesn't the fleece flower remind you just a bit of this camellia?

Came back next week for more fun with fleece!

Saturday, February 3, 2018

Mass Production

Last month, I discussed designing a patch for Makers Local 256, a makerspace I belong to.  When I passed around the patch I'd made, there was quite a bit of interest in it, so I decided to produce a number of them.
I made three different varieties --  sew on, velcro-backed, and iron on.  I obtained 3" die cut velcro circle and that set the size for all of the patches.  As before, the fabric I used was denim left over from making a pair of jeans.

I cut all of the circles with my Cricut maker.  This ensured that the circles were all perfectly round and exactly the right size.

My local Husqvarna dealer, S&R Sewing And Vacuum had some specialty materials for making patches.
I used a 6"x9" hoop so I could fit four patches in each hoop to use the heavy duty water soluble stabilizer efficiently.

It turned out to be most effective to line up the patch fabric on the sewn die line by looking at the underside of the clear stabilizer.

After the patches were sewn out, the stabilizer was removed by washing in hot water and then the patches were hung up to dry.

Finally,the iron on material was added to the iron on patches and the velcro backed patches.  In the case of the velcro backed patches, it was used to stick on the velcro circles.
The patches are a big hit!  While making them didn't involve a laser cutter, members like them.  It's a different set of materials and techniques than most of them use.  Makers Local 256 has a lot of diverse projects going on and I'm happy to add to that diversity.

Come back next week for more fun with a sewing machine!


Saturday, January 13, 2018

Cork Wallet

I have this old wallet.  It's served me very well for many years, but it's worn out.  I also have this very interesting cork material that I bought at the Houston International Quilt Expo.  Maybe the two of these could meet and create something special.


Here's the old wallet.  Two of the things I like about it are the coin purse (on the outside) and all the pockets on the inside.
The idea is to replicate the wallet (mostly) in new materials.  The exterior is this lovely cork material.
It's a thin layer of natural cork bonded to canvas.  It is very flexible and not at all stiff.  It is a little thick.  I've seen it dyed a variety of colors, but I liked the natural look better.  The piece I bought also had this nice flower print.

The cork is too thick to make all of the lining pieces from it.  I chose to use ordinary polycotton broadcloth.  A binding material is also needed and I chose a 5/8' ribbon type material.  I managed to find both of these a 9PM at Wal-Mart after I got a wild hare to work on the project.

The first parts I made were the pocket sections for credit cards.  There are two sections, on one the right side of the wallet and one in the middle.  Each section has 3 pockets.  The top pocket is made from cork for decorate purposes, all of the others are just broadcloth.  Each pocket is 4.25" x 2".  The first step is to put binding on the top edge of each pocket.
The pockets are sewn to a backing piece that measures 4.25" x 3.375".  The idea is to make them evenly spaced.  The bottom of the pockets are just sewn to the backing.  Since polycotton broadcloth doesn't ravel, the bottom edges weren't finished.

Here's both sections of pockets sewn to the front of the bill pocket, which measures 4.25x7".  There's actually a sandwich here -- one layer of broadcloth, one layer of interfacing, one layer of broadcloth and then the pocket sections.  The left side and top of this piece then gets binding.  There's two hidden pockets between the pocket sections and the bill pocket lining.

Now it's time to assemble the outer part of the wallet.  The lining is a simple piece, 5" x 9".  The loop part of hook and loop tape (Velcro) is sewn to one side, with just enough clearance for the binding.
The real outside is a bit more complicated because of the coin purse.  The cork piece is 5"x7.5".  Then there's a zipper, and then a 1" strip of broadcloth with the hook side of the hook and loop tape.  The whole piece should measure 9" long when finished.  Also, there's a 5"x 3.5" piece of broadcloth sewn to the underside, under the zipper for the coin purse.  The bottom of the coin purse is attached with a line of stitching through the cork, the other side will get caught in the binding.

The outside and lining are put together, then the bill pocket piece is added.  Binding is sewn around the outside of the whole wallet.
Here it is: the inside  of the finished wallet.  I've been using it for a few days and it works great.  I really like the light color and distinctive pattern: it makes it lots easier to find my wallet in my purse.

Come back next week for more fun with a sewing machine.


Saturday, September 9, 2017

New Purse and the Jumbo Hoop

While at the Huntsville Hamfest, one of my fellow amateur radio operators, saw my purse, the one I specifically designed for this hobby.  I wrote about it here, theree weeks ago.  She wanted one for herself and I agreed to make one.  Here's a picture of the final result, with part of her call sign covered to protect her privacy.  She specifically requested the red and white color scheme and the materials are microsuede, as before.


When I made the original purse the radio applique was done with hand guided techniques.  That worked, but it's not the only way to achieve the desired result.

I've had this Bernina Jumbo Hoop lurking in the sewing room.  Just learning to use the machine has been intimidating, so I'd never gotten the hoop out of the box.  However, it's just the thing for this project since it let me do all of the embroidery and applique without removing the fabric from the hoop.
The flowers and lightening bolts are commercially available embroidery patterns available from Embroidery Library.  The radio applique was original work. I decided to keep the radio as applique.  Part of the reason is the need for a mesh panel, so that the radio can be heard, even when in the purse.  I fired up my Floriani embroidery design software and used simple shapes to construct the radio as an applique.  Then I just added the lightening bolts, flowers, and the call sign as text.
I printed the embroidery pattern and laid it over the purse front as a test fit.  Work on in the design software to get all the elements of the design in the right place worked well, with a couple of iterations.

The next challenge was to figure out how to hoop the project.  I like cut away stabilizer for this project, since it can be left whole as interfacing for the purse.  However, the cut away stabilizer isn't wide enough to work in this hoop!  Instead, I cut the cut away stabilizer as interfacing, just the same size as the purse front.  Then I got a roll of 20" wide tear away stabilizer and created a piece big enough for the jumbo hoop.  Finally, I sewed all three layers together and then hooped it.

The first part of the embroidery was create the radio.  I started with a sew out of the outline of the radio and mesh window.
Next, I attached the black applique fabric to the front of the purse using a spray-on fabric glue.  Then I attached the mesh to the back of the project with masking tape (available in the paint section of your local hardware store). 
I finished the applique and then the rest of the embroidery, resulting in a very nice purse front.
The red and black fabric, along with the stabilizers, was cut away from in front of the mesh window.

The lining of the purse requires a matching mesh window to line up with the one on the front of the purse.  This can be made somewhat larger than the circle in the front. In this view, the lining is on top of the purse front and the table can be seen through 2 layers of mesh.
 A pocket is sewn on top of the lining mesh window to hold the radio.  Elastic in the top of the pocket holds the radio in place.

After the lining and the outside of the purse are complete, the two are sewn together at the top, resulting in a nice finished project.

This was an interesting project because it involved learning new things with the embroidery software, which I am still struggling to master and using new hardware, the jumbo hoop.  Working with the hoop went a lot more smoothly than I'd ever hoped for.  

Check back next week for an all new project with the jumbo hoop!

Saturday, August 19, 2017

Amateur Radio Operator's Purse

It's Hamfest Weekend here in Huntsville, Alabama, when amateur radio operator operators gather from far and near.  There aren't many Young Ladies (a term encompassing all females with radio licenses) in the hobby, but there are a few of us.  We all need some place to stash a handheld radio.  It's also customary for radio operators at an event like this to wear something, like a hat, shirt or name tag with our call sign that identifies us to others we might have talked to on the radio, but never met.  I decided to create a purse that would fulfill both needs.
 This handy purse displays my call sign and has a specially designed pocket for my radio.  The lightening bolts and daylilies are just on there for ornamentation.  It's made of micro suede, which is easy to work with, durable, and even washable.  I'd live to give a pattern number for this purse, but there isn't one.  It's an original design that I've evolved after making a few purses.  The purse is deliberately small, so it doesn't tend to collect junk.

I used a variety of techniques in embellishing the purse.  The radio is applique.  Needless to say, there's not a applique pattern commercially available, so I designed my own and hand guided my machine to stitch it down.   The buttons on the radio were also hand guided machine embroidery, with a wide zig-zag stitch.  The lettering is from built in stitches in my sewing machine.  The "speaker" in the middle of the radio is actually reverse applique.  The mesh is attached to the back of the micro suede fabric and once the circle was sewn, the micro suede was cut away to reveal the mesh.  There's a matching mesh window in the purse lining, enabling the radio to be monitored while it's in the purse.  My call sign and other embellishments were done with conventional machine embroidery.

The top of the radio pocket has elastic, which keeps the radio from falling out.  The purse is closed with a zipper.  The open end of the zipper is on the same end as the radio pocket, so the antenna can stick out of the purse while it is closed.

Come back next week when I explore using a new to me kind of fabric.